Penne alla Vodka

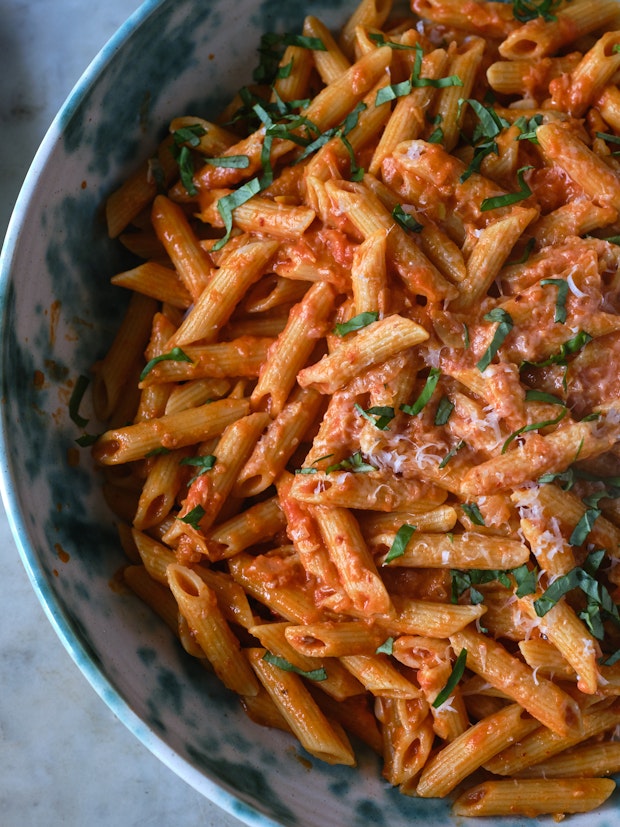
Hear me out. To make the best version of penne alla vodka the first step is to peel the skin from a lemon. Hand cut the peel into the thinnest strips (no pith!) and then place the zest into your vodka while you prep the rest of your ingredients. Using lemon-scented vodka flecked with zest in your creamy tomato vodka sauce is a game changer. There are a number of other considerations that I’ll outline below that help when you want to throw together this one-pot crowd-pleaser!

penne alla vodka in a large bowl

What Makes Great Penne all Vodka?

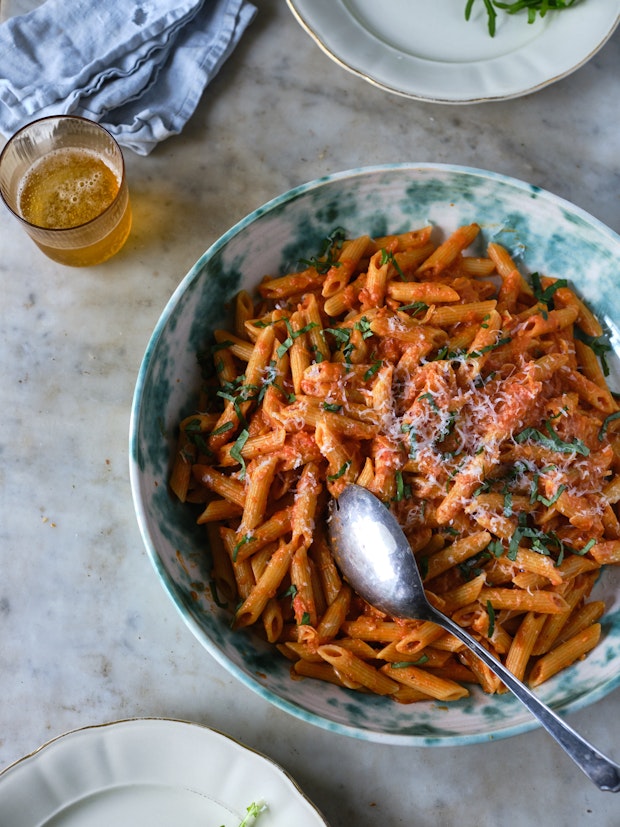
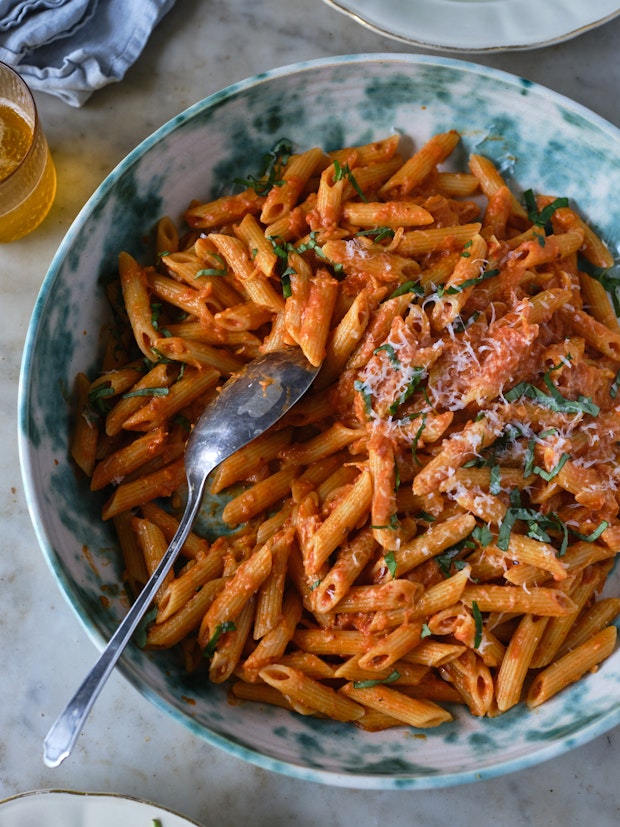
If you want to make great penne alla vodka, focus on the sauce. There are a number of ways to approach this Italian (and Italian-American) classic, popular in the 1980s. You’ll see versions made with canned tomatoes, while others exclusively use tomato paste. Some recipes call for a lot of tomatoes, others barely any. Some really go for it with heavy cream, I like to use just enough cream to create a rich, silky sauce without diluting the tomato flavor excessively. This recipe delivers a bright, rich tomato vodka sauce that clings beautifully to the pasta. The flavor has dimension from the two types of tomatoes used, and the scent (and bursts) of lemon zest.

Penne alla Vodka: The Ingredients

  • Dried penne pasta: Use a good-quality dried pasta here. Penne is the classic pasta shape to use, but rigatoni is another favorite. Something bite sized with lots of surface area for the vodka sauce to cling to is the key. For a bit of added nutrition, explore whole wheat pastas, or pasta made with lentils or chickpeas. A forever favorite of mine is the Monograno Felicetti Farro Penne Rigate.
    ingredients for cooking penne alla vodka including tomato paste, dried pasta, basil, and garlic
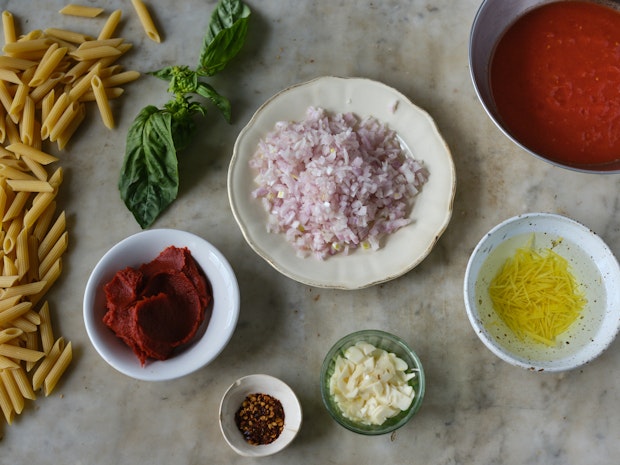
  • Tomato Paste: I tend to use the tiny cans of tomato paste here, because I use about ~1/3 cup. But if you have enough in a tube, that’s fine.
  • Canned Tomatoes: Look for good-quality whole canned tomatoes. I call for a 14-ounce can, but sometimes all you can find are 28-ounce cans of whole tomatoes. In this case, use
  • Heavy Cream: A pro-tip here is, avoid going overboard with the heavy cream. I see some recipes calling for upwards of a cup. You can use less, and maintain the creaminess you’re after. A bonus is your sauce will maintain beautiful color. Add too much cream and the sauce quickly changes to a soft pink, while the tomato flavor weakens.
  • Olive Oil or Butter: I tend to use olive oil when I make penne alla vodka, but butter is also wonderful. Use either.
  • Vodka: The vodka in penne alla vodka plays a few important roles. It heightens flavors when certain alcohol soluble compounds in the sauce ingredients are released by the vodka. It also helps to keep the sauce beautifully silky and emulsified. And yes, much of the vodka cooks off with a bit of time simmering.
  • Garlic, Onion, Chile Flakes, etc: I dial up the garlic for this recipe. It has time to soften and mellow, so don’t be alarmed. And the onions are diced, I like a really small dice here. So you’re getting onion bits throughout the sauce and not larger chunks.

penne alla vodka being served on a marble table set with plates and a cloth napkin

Variations

Here are some favorite variations on penne alla vodka that I’ve cooked over the years.

  • Penne alla Tequila: Quite honestly, I don’t tend to keep vodka in my pantry. So I have to plan ahead when I want to make this. In a pinch, if you have tequila and not vodka, go ahead and make the swap. Super good.
  • Make it Spicy: My favorite way to make penne alla vodka spice is to add a bit of spicy Calabrian pepper paste (the one I buy most is called Bomba di Calabria)) to the sauce at the same time the tomato paste is added. Go easy, some of these pastes are wildly spicy. A finishing drizzle of a spicy chile olive oil can add dimension and another layer of heat. I like Brightland’s chili olive oil for this (not sponsored, just a fan), or drizzle a few drops of oil from the jar of Calabrian pepper paste.
  • Make it Vegan: You can make this recipe vegan by skipping the Parmesan, using olive oil to simmer the onions, and using a cashew cream in place of heavy cream. To make cashew cream, soak 1 cup of cashews in 1 cup of water for thirty minutes or so. Puree in high-speed blends until silky smooth.

penne alla vodka in a bowl with creamy sauce finished with lots of Parmesan cheese

More Pasta Recipes

Continue reading Penne alla Vodka on 101 Cookbooks

Roasted Mushroom Sandwich

A number of you were curious about the picture of this mushroom sandwich when I included it in my newsletter last week. Here are the details along with the recipe down below! It was the centerpiece of a quick, 10-minute lunch. The next time you have mushrooms on hand, I encourage you take this idea for a spin. You end up with a super tasty, satisfying sandwich.

open-faced mushroom sandwich on sourdough bread

Roasted Mushroom Sandwich: The Details

Here’s how this comes together. Take a good piece of sourdough bread, toast it, rub it with a garlic clove. Slather the toast with some ricotta that you’ve salted a bit. Take some leftover stuffed mushrooms, slice them thinly and arrange on top of the ricotta. Place the open-faced sandwich until the broiler for a few minutes. Finish with a crush of kale chips. If you don’t want to bother with using stuffed mushrooms, you can use simple roasted mushrooms! ingredients for mushroom sandwich on baking sheet ready to broil

A Variation

These baked mushrooms with miso butter (pictured below) can be swapped in for the stuffed mushrooms as another alternative. Keep all the other components the same. The bread, ricotta, etc. Just drop a tangle of these on top of the ricotta and give a quick broil.baked mushrooms in a baking dish

More Sandwich Recipes

Continue reading Roasted Mushroom Sandwich on 101 Cookbooks

Stuffed Mushrooms

I made these stuffed mushrooms on a whim yesterday with ingredients ready to be used up in the refrigerator. They were so good (and easy!) I feel like I have to share. Stuffed mushrooms make the perfect bite-sized party appetizer or, in this case, a fantastic weeknight side. The filling is creamy chive and garlic-flecked goat cheese offset with plenty of crunchy breadcrumbs.stuffed mushrooms in a white serving dish

How to Make Stuffed Mushrooms

The process for making stuffed mushrooms is straight forward.

  1. Carefully break the stem off each mushroom.
  2. Brush any dirt or debris from mushrooms with a damp cloth.
  3. Make the filling and place a couple teaspoons in each mushroom cavity.
  4. Arrange on an olive oil coating baking sheet and bake until tender and golden.

ingredients for making stuffed mushrooms on a kitchen counter

Choose Your Mushrooms Well

I happened to have the perfect mushrooms to make these at the ready last night, but I’m actually a bit choosy if I know I’m buying them to make stuffed mushrooms. I like to use brown mushrooms that are in good condition – not too scratched, misshapen or damaged. They will shrink a bit in the oven, but I aim for mushrooms that aren’t too big, and aren’t too small. Ideally, you’ll be able to pop one on your mouth in one bite, but you also want the mushrooms to be big enough that they’ll hold a good amount of the flavorful filling.

stuffed mushrooms arranged on a baking sheet prior to being place in an oven

What to do With Leftovers!

We had a few stuffed mushrooms leftover so I made these open-faced mushroom sandwiches for lunch today. The mushrooms were sliced thinly on homemade sourdough that had been toasted and rubbed with garlic. I slathered some salted ricotta across each piece of toast, arranged a few of the sliced mushrooms on top and finished everything under the broiler for a few minutes. Finished with a crush of kale chips.  Perfect 10 minute lunch!

stuffed mushrooms sliced and arranged on an open-faced mushroom sandwich with ricotta

Stuffed Mushrooms: Variations

You can take this general recipe in *so* many directions. A couple ideas:

  • Make them spicy!: Add a minced serrano to the filling. Or a couple teaspoons of a favorite harissa.
  • For the herb lovers: Add more chopped herbs like mint, basil, and/or thyme. Whatever in season. Load it up!
  • Curry Stuffed Mushrooms: Add a favorite curry paste or powder (to taste) to the filling. I’d start with a teaspoon at a time. You can experiment with Thai curry pastes, Indian curry powder, Japanese curry paste, etc.

stuffed mushrooms arranged on a baking sheet after baking

More Mushroom Recipes


Continue reading Stuffed Mushrooms on 101 Cookbooks

Kale Chips

This is my love letter to kale chips, a constant in my kitchen throughout the year. We bake them 3 or 4 times a week, even if we’re out in the trailer with a tiny oven. Even when it’s too hot for a reasonable person to turn on the oven. This is because kale chips are simple to make, and also because they’re *SO* good. Everyone loves snacking on them – even raw kale haters. They’re also an easy way to add a fantastic nutritional boost to all sorts of soups, salads, pizzas, and stir-fries by throwing a handful on (or in) whatever you’re eating. I’ve tweaked my technique little by little over the years to get the best results, outlined below! First thing to know – there are some details to get right.

Crispy baked kale chips in a bowl

How To Make Great Kale Chips

To make the best kale chips, a specific type of kale (curly!) is massaged with a delicious slurry of olive oil, nutritional yeast, and a bit of salt. Don’t skimp on the nutritional yeast, you’ll want to load up to get the perfect crispy crust on your chips. Bake until crisp and enjoy. The recipe is fantastically straight-forward, but the details matter. Here are the key pointers.

  • The type of kale matters. Purchase curly kale, premier kale, or curly purple kale. These types of kale have much more volume than kale varietals with flat leaves (for example, lacinato kale). The increased volume will result in crisped pom-poms of kale – exactly the best kind of kale chips.
    bunch of curly kale on a marble kitchen counter
  • Use dry kale. Make sure your kale is as dry as possible before starting. This will promote crisping and minimize steaming as the chips bake. You only want olive oil, nutritional yeast and a bit of salt to coat the leaves (below), no water drops.
    ingredients for kale chips in a mixing bowl
  • Avoid over-baking. Kale chips go from crisp to brown and sad in a flash.They’re like pine nuts in that regard. The pro-tip here is: set a timer.

How Do You Keep Kale Chips Crispy?

Allow them to cool completely. Store in and airtight container or jar.

Variations

You can make variations on kale chips by adding dry seasonings and spice blends. I like to add most seasonings after they bake. This way your spices don’t burn. I use this approach for curry powder and za’atar – two favorites. You can also look on this page of spice blends for other homemade blends I like to make and keep on hand.

baked kale chips on a baking sheet after baking

What Can you Crumble Kale Chips Over?

I like to crush kale chips over a wide range of soups, pizzas, tacos, and the like. The joke around here is, if it’s savory, I’ll crumble kale chips on it. Here are a few links to ideas and inspiration.

More Recipes with Kale

Continue reading Kale Chips on 101 Cookbooks

Cheesecake Bars

I started making these cheesecake bars twenty years ago. They’re beautiful, wildly decadent, and the perfect special treat. Pools of citrus curd blend into a vanilla flecked cream cheese filling. A shortbread cookie crust provides crunch and structure as the base. With each bite you’re hit with a blast of citrus intensity, and the swirl top is dramatic and beautiful.
slice of a cheesecake bar on a small plate with a fork

Cheesecake Bars: The Inspiration

There was a moment in the early 00s where ripple-topped cheesecake bars were having a real moment. I clipped a number of versions from newspapers and magazines including one from Food & Wine magazine and another from the Spring 2004 issue of Donna Hay. These bars were typically lemon flavored but I found over the years that I really love making zesty grapefruit versions, or my absolute favorite (pictured here) – blood orange. I include instructions in the recipe below.
cheesecake bars served on a marble table on plates

The Ingredients

The ingredient list for these cheesecake bars is quite straight forward. If you keep cream cheese on hand, you might have the rest of the ingredients in your pantry. A couple notes related to key ingredients.

  • Cream Cheese: Go for the real deal, full fat version here.
  • Citrus: I call for a blend of orange and lemon juice in this version of the recipe, but you can play around with whatever citrus you have on hand. I’ve had it on my list to experiment with a key lime version (or makrut lime!) for ages.
  • Sugar: Opt for a fine, granulated sugar here.

cheesecake bars baked in a glass baking dish

How To Make Cheesecake Bars

There are three main components to these cheesecake bars. The shortbread base, the cream cheese filling, and the citrus topping swirl.

  1. Make the cookie base: You can see the concept pictured here (below). Press and bake cookie dough into your pan and bake until golden.
    cookie dough crust as first layer in glass baking dish
  2. Make the citrus curd swirl mixture: This is done in a saucepan using egg yolks citrus juices, sugar, cornstarch, heat, and patience.
    curd ingredients in stainless steel saucepan
  3. Make the cream cheese filling: This step is a breeze. You basically whip up a lot of cream cheese, then sweeten and flavor it.
  4. Assemble and bake. One of the keys here is avoiding baking too long. You want to bake these bars until they’re just set in the center.
    cheesecake bars baked in a glass baking dish

Cheesecake Bars: Variations

As mentioned above, the first way you can switch things up here is to play around with the shape of the pan you bake in. You can make individual tarts or mini-tarts, or bake in a long pan and slice into strips.

  • Lemon Cheesecake Bars: Use freshly squeezed lemon juice and lemon zest. Bonus points for using Meyer lemons – extra special!
  • Orange Blossom Cheesecake Bars: This version is beautiful. Use a small splash of good quality orange blossom water in place of the vanilla in the recipe. It accentuates the orange in the recipe and perfumes your entire kitchen as the bars are baking.
  • Rose Citrus Cheesecake Bars: This is the same idea as the orange blossom version above, substitute a splash of rose water for the vanilla in the recipe. Or! Leave the vanilla in. Rose, vanilla, and orange are a beautiful combination.

cheesecake bars baked in a glass baking dish
More Baking Recipes

slice of a cheesecake bar on a small plate with a fork

Continue reading Cheesecake Bars on 101 Cookbooks

Vegan Shepherd’s Pie

This recipe uses a number of my favorite techniques: mashing, slathering, and drizzling. Imagine a Shepherd’s pie meeting the flavors of an Indian samosa. That’s where we’re headed. Shepherd’s pies are typically lamb or meat based, but this is a veg-friendly version.
Make Ahead Vegan Samosa Shepherd's Pie

Vegan Shepherd’s Pie: The Process

Here’s how this shepherd’s pie comes together. It’s pretty straight-forward. You make a hearty, flavor-packed, vegan base using split peas (or lentils), chopped mushrooms, spices, and crushed tomatoes. Layer this under a thick slather of mashed potatoes and baked until the top is golden and a bit crusted. If I know the week ahead is going to be a crusher, I’ll assemble everything over the weekend, and all I have to do is pop it in the oven a bit later in the week. Give it a go, this has been on repeat all winter.

Individual Pies!

You can certainly create smaller, individual pies – they’re cute, and people love getting their own individual pie.

Sweet Potato Variation

You can absolutely swap in sweet potatoes here, just give them a quick peel first.

More Pie Recipes


Continue reading Vegan Shepherd’s Pie on 101 Cookbooks

Best Chocolate Cookies

I came across the perfect chocolate cookie when I visited Portland years ago. The cookies were popular in the coffee shop I would visit, and I loved them. Each cookie was a crackle-edged puddle of chocolate with a texture that made me think of a collision between soft meringue and a fudgy brownie. I fell hard. In the years since, we’ve come to call them chocolate puddle cookies, and there are just six ingredients between you a baking sheet of them. No mixer necessary, just a big bowl and wooden spoon.
chocolate cookies on parchment paper after baking

Chocolate Cookie Inspiration

As far as the origins of this recipe? I came across a recipe shortly after my return from Portland that sounded very close to the cookie I tasted there. The Portland chocolate cookies seemed to be a version of François Payard’s Flourless Chocolate-Walnut Cookie. But, the recipe I was working from didn’t work all that well for me. The good news is, it did provide a good starting point. I adjusted a few ingredients, tweaked my technique, and now I’ve been able to make them reliably making little tweaks along the way. All my insights and ingredient notes are integrated into this page and recipe.

Chocolate Cookies: The Ingredients

The ingredient list here is short and direct. There’s a good chance you have all the ingredients on hand – cocoa, powdered sugar, egg whites, walnuts, vanilla, and a bit of salt. A few related notes:

  • Cocoa powder: I’ve used a wide range cocoa powder in these cookies over the years. The key here is to use unsweetened. For a long time I tended to use non-alkalized cocoa powder (Scharffen Berger or Dagoba) but also tested with Droste, which is a Dutch-process cocoa powder. And! I just made a fantastic batch using Guittard Cocoa Rough last week. Pictured here. So, use what you like, just be sure it’s not sweetened.
  • Walnuts: On the walnut front, be mindful of how you toast your walnuts, it’s the single factor that impacts the personality of these cookies most. Using deeply toasted walnuts makes for a much more intense, nutty cookie. Lightly toasted walnuts can sometimes be mistaken for chocolate chips, and make for a much more mild cookie. Both good!
  • Powdered sugar: I’ve used both 365 organic powdered sugar from Whole Foods, and Hain organic powdered sugar with success.
  • Eggs: Use large eggs, I suspect if you use extra-large, the batter will run, and you’ll have to compensate with more powdered sugar.

Technique and Pro-tips

Reading this far will pay off, I promise. Here are a couple things that really make a difference here.

  1. Sift. Really, don’t skip this step. Get all those lumps out.
    chocolate cookie ingredients sifted into a bowl
  2. Add ingredients in the correct order. This is what your mixture should look like after mixing in the walnuts. (below)
    chocolate cookie dry ingredients combines in a mixing bowl
  3. Consistency. This is roughly what your cookie batter should look like after mixing in the egg whites.
    chocolate cookie batter in a mixing bowl
  4. Bake & Cool Completely. Do your best to avoid under-baking, and after baking, allow the cookies to cool completely. A couple hours is best. They will set up beautifully. The goal is a clean break-away from the parchment paper. It’s sometimes hard to tell when these cookies are fully baked, the ones in the picture directly above are slightly underbaked for my tastes. So I adjusted with the remaining two cookie sheets.
    chocolate cookie cooling on racks in a kitchen

Chocolate Cookie Variations

I like to make these just as written in the recipe below. It’s one of those rare cooking endeavors where I don’t mess around much. But there have been many great comments over the years. A lot of people make these chocolate cookies with toasted pecans in place of the walnuts. Some add the zest of an orange. And another person recommended dried cherries. Espresso powder was something I’ve considered but never tried (although some of you have!).And numerous people like to freeze these cookies, and crumble them over ice cream for the win!

I hope you enjoy these as much as I have. They’ve become family favorites.

close up of chocolate cookie on a marble countertop

Best Cookie Recipes

chocolate cookie on parchment paper after baking

More Chocolate Recipes

Continue reading Best Chocolate Cookies on 101 Cookbooks

Harissa Spaghetti

Earmark this harissa spaghetti for an easy weeknight meal. You won’t be sad about it! The inspiration? One of the condiments that survived my recent refrigerator scouring was a three-quarters full tube of harissa. It’s the beautiful brick red, earthy, and often potent North African spice paste. I earmarked it for a spaghetti dish I had in mind. Whole wheat spaghetti, inky black olives, kale, and toasted nuts tossed in a pan to tangle with a garlic-charged harissa and olive oil sauce. Little flecks of lemon zest brighten each bite. I did it, and it’s wonderful.

spaghetti tossed with harissa oil, kale, and walnuts served on a platter

Choose your Spaghetti

You can use whatever spaghetti you love here, of course. Keep in mind, there are many interesting pastas to explore these days. They’re made with everything from red lentils or chickpeas, whole wheat to quinoa. I love the added nutritional punch you get from using some of these. The spaghetti below is made from farro and add wonderful dimension to the overall dish (this one).

harissa spaghetti ingredients arranged in bowls on counter

Let’s Talk Harissa

Keep in mind as you head into this recipe that the range of harissas available for purchase is vast – trust your taste buds, and if any of you have favorite brands, give a shout in the comments. One tube might be tastelessly tomato-y, the next tongue-torchingly hot. That being said, the best road to a great harissa is to make your own, but I’d be lying if I said I’m religious about it – hence, the tube of red in my refrigerator door.
spaghetti dinner tossed with harissa oil, kale, and walnuts on a table being served

Make Your Own Harissa

I don’t have a homemade harissa on 101 Cookbooks at the moment. But a number of people have mentioned favorite recipes in the comments.

  • ValHalla: “I use Deborah Madison’s recipe from Vegetarian Cooking for Everyone. (There’s also an amazing stew with harissa in that book.”
  • Bryan: “I swear by the Zuni cookbook recipe for harissa. it’s totally labor intensive but totally worth it. Plus, it’s a great excuse to finally use up a significant number of spices from the pantry. It’s full flavored, well balanced, a little spicy, and the recipe makes a ton. Perfect for freezing.”
  • I’ve also had good results with this recipe.
  • Kitty also mentioned the following about buying harissa in jars instead of tubes. “There are many kinds of harissa, and many degrees of “heat” for the paste. I would recommend purchasing a jarred harissas rather than the one in the tube. I have always found the latter to have a metallic aftertaste.”

If you have a favorite harissa, give a shout in the comments!
spaghetti tossed with harissa oil, kale, black olives and walnuts served on a platter

More Pasta Recipes

Continue reading Harissa Spaghetti on 101 Cookbooks

Homemade Coconut Cream Pie

This pie was inspired by my dad. He requested coconut cream pie in place of cake for his birthday, so I got to work. I knew he was after a homemade, old-fashioned version. It needed to be a creamy, sweet coconut cream pie loaded with whipped cream and coconut flakes. He reminisces about Marie Callender’s version, so I kept a photo of one of their pies on my desktop as reference. Lol. At the same time, I was also aiming for a pie that had some balance. After a few rounds, I landed on using buttermilk and sea salt in the coconut filling for a filling that is hard not to love.
coconut cream pie in a glass pie plate with a slice cut out of it

Coconut Cream Pie: The 3 Main Parts

A classic coconut cream pie has three main components.

  1. A really good pie crust: Golden, flaky, with good structure. The pie crust will be fully baked prior to filling. Instructions below! I use this pie crust dough for a lot of pies.
    a fully baked pie crust prior to filling
  2. Creamy coconut pudding filling: Arguably the heart and soul of this pie. Spread it across the fully baked pie crust (pictured below). Then refrigerate until set.
    a fully baked pie crust filled with coconut cream pie filling
  3. Whipped cream topping with toasted coconut: Just before serving whip some heavy cream with a kiss of powdered sugar and pile it on top of the coconut cream filling. Add a finishing touch of toasted coconut flakes, slice into wedges and enjoy!

How To Make the Coconut Cream Pie Filling

There are basically two major ways to approach coconut cream pie filling. You can make a homemade coconut pudding on the stovetop or you can make the filling using pudding mix as the base. This pie uses vanilla pudding mix to provide a quick, stable, reliable foundation. The pudding mix is combined with buttermilk and sea salt to balance out the sweetness contributed by the pudding mix and a lot of sweetened coconut. A bit of whipped cream is folded into the mix to bring a bit of lightness to the filling. You will be able to make the filling in five minutes flat. It’s fool-proof and absolutely delicious.

There’s certainly an argument for making homemade coconut pudding for the filling here. But because this has become one of my favorite “quick” pies to throw together, I go the pudding route. No egg tempering required.

a pie crust after blind baking with pie weights and dried beans

How Do I Blind Bake a Pie Crust?

A pie like this requires a fully baked pie crust also known as a blind baked crust. Blind bake pie crusts are used for pies with a no-bake filling. I include detailed instructions in the recipe, but the picture (above) demonstrates the general set-up. To blind bake a pie crust, line a pie plate with your pie dough. Place a sheet of parchment paper or aluminum foil to cover the dough. Then fill completely with pie weights, or dried beans. Bake until the edges of the pie crust become golden. Carefully remove the pie weights, dock with a fork to prevent air bubbles, and brush the edges with an egg wash. Bake for another 15 minutes or until the entire crust is beautiful golden.

What Kind of Vanilla Pudding Mix Should I Use?

When you go to buy pudding mix for this pie, you want instant pudding mix. That’s the first thing. My recipe calls for two boxes of 3.4-ounce vanilla instant pudding mix. I’ve been using the 365 Whole Foods Market Vanilla Instant Pudding most often – works great. But I’ve also tested with Jell-O instant vanilla pudding (3.7-ounce boxes). Seems a bit sweeter, but works well. Basically, don’t get hung up on the weight of the pudding boxes, just aim for something in the 3.5-ounce size range and confirm it is instant.
A whole coconut cream pie photographed from above

Coconut Cream Pie: Variations

Little tweaks to your coconut cream pie filling and topping can have big impact. If you want a classic flavor profile, go the vanilla route. Personally, my favorite version is made with a couple generous splashes of bourbon. It’s boozy, decadent, and wildly good. Instructions for both versions are included in the recipe below.

  • Bourbon Coconut Cream Pie: Add 2 tablespoons of bourbon to the coconut cream filling and mix until the pudding begins to thicken. Follow the instructions for whipping the cream with powdered sugar. Adding 1 tablespoon bourbon to as soft peaks are forming and continue to mix.
  • Vanilla Coconut Cream Pie: This is my basic recipe. Some recipes use coconut pudding or coconut pudding mix, and/or coconut extract, and coconut milk in their coconut cream pie. But I feel like the amount of sweetened coconut in the filling delivers plenty coconut flavor. And I prefer the texture and mouthfeel here. I use 2 teaspoon of good vanilla extract in the filling, and 1 teaspoon in the whipped cream topping. 

close up of side view of a coconut cream pie in a glass pie plate with a slice cut out of it

Make Ahead!

This is one of the easiest pies I make. And least time intensive. And it’s a breeze to thread into your life. Even if you only have a few minutes here, and a few minutes there. The most intensive aspect is keeping an eye on the pie crust as it is baking, to get it just right.

  • Make the pie dough: You can do this weeks ahead of time and place each round of pie dough double-wrapped in the freezer. Or make it a few days ahead of time and keep refrigerated.
  • Make the filling and fill the pie: You can do this up to a couple days ahead of time.

More Pie Recipes

Continue reading Homemade Coconut Cream Pie on 101 Cookbooks

Winter Penne Pasta

This winter penne pasta was inspired by the contents of a produce box. I seem to inherit CSA boxes. Friends and neighbors forget to put holds on their subscriptions before leaving town, and sure enough, they end up in my kitchen. When I was a kid there was a house that was always happy to take in stray animals, I’ve become the equivalent for CSA boxes. And I have to say, it’s pretty great.

penne pasta made with winter greens like kale and goat cheese on a floral plate

That said, cooking through a box is always a challenge of sorts. I mean, you want to cook your way through it before things start to go bad, sad or wilted. This always forces me to adapt and try out ideas I might not have considered otherwise. You also have the element of surprise that comes along with each box because you never know exactly what will be inside each one. Although, there is one thing I do know. The box, whichever farm it comes from, usually includes lots and lots of greens – kale, spinach, lettuce, chard, arugula. If I’m lucky, all of the above.

Winter Penne Pasta: Inspiration

Tonights box? A quick glance told me I would need to put a dent in the greens right away. That was the tone setter. Everything else I grabbed from staples in nearby cupboards and the refrigerator. It all came together into this simple, one-pot, winter penne pasta. The sauce is made from one bunch of kale, shallots, garlic, and goat cheese blended.  It creates a vibrant green sauce to coat the penne, offering a nice alternative to tomato sauce, mushroom ragù, or pesto.

green sauce in food processor to pour over penne pasta

Winter Penne Pasta: Variations

You might tweak it with a different cheese – Parmesan or pecorino, for example. Or even ricotta. You could top it with a some chopped black olives or toasted nuts. I kept it simple here. You can reheat any leftovers the next day, with a splash of water. The pasta holds up nicely. Penne is a nice shape to hold the green sauce, but a second favorite choice is actually a version with gnocchi in place of the pasta.

I know a lot of you subscribe to CSAs and I’d love to hear your favorite ways to use up your greens. I have a bunch of go-to green-intensive recipes I rely on, but if you’re doing something unique or unexpected with them on your end please share. I suspect Melissa Clark’s kale salad will continue to be in high rotation around here all winter. I keep making it, in part because unlike other green salads that go south shortly after being dressed, this kale salad likes to party. It’s delicious, and just gets better as it sits around, fully dressed, waiting for people to notice it. Other favorites? You can’t go wrong with a hefty pot of Ribollita – I trade off between that and various takes on this lentil soup to which I add lots of chopped kale.

penne pasta made with winter greens like kale and goat cheese on a floral plate

More Pasta Recipes

More Kale Recipes

Continue reading Winter Penne Pasta on 101 Cookbooks